I want access from my laptops to various services (web proxy and email) on my home network, even when I’m away. A convenient way to do this is to use SSH port forwarding. This is a nuisance to repeatedly initiate manually though; I would rather have my laptop run the SSH command automatically, and restart it after network outages.
You will need to create a user on the server for the clients to connect to. You could use your own login, but I prefer to use a special-purpose user. In my case it’s called kakajou, which is the name of a laptop that connects to it.
Out of paranoia, all of its files and directories are owned by root. So even if an attacker gains control of it, they can’t change much.
You will need a script to run on the server. This script is responsible for two things: firstly, keeping the session up (i.e. by not exiting) and secondly for exiting in a timely manner when the session terminates. It achieves this by sending bytes back to the client from time to time.
$ cat ~kakajou/idle
#! /bin/bash
set -e
while :; do
  echo
  sleep 60
done
For each client you’ll then need to add an entry to the user’s ~/.ssh/authorized_keys file, locking it down to just the desired command and tunnels. The line looks like this (with most of the public key elided):
command="/home/kakajou/idle",no-agent-forwarding,no-user-rc,no-X11-forwarding,permitopen="www-proxy:3128",permitopen="imap:143",permitopen="smtp:25" ssh-rsa AAAAB3N...Q== root@kakajou
First add a ~/.ssh/config entry to set up the desired tunnels:
$ sudo cat ~root/.ssh/config
Host tunnels
     Hostname anjou.dynamic.greenend.org.uk
     User kakajou
     LocalForward 1143 imap:143
     LocalForward 2525 smtp:25
     LocalForward 3128 www-proxy:3128
     ServerAliveInterval 5
     ServerAliveCountMax 3
The ServerAlive... options cause the client side to send empty messages to the server, ensuring that the connection will close in a timely manner if connectivity is lost. The important bit is not so much closing the old connection as allowing a new one to start up.
Next create a script to repeatedly connect:
$ cat /local/bin/setup-ssh-forwards
#! /bin/bash
set -e
exec > /var/log/ssh-forwarding.log 2>&1
while :; do
  ssh tunnels /home/kakajou/idle >/dev/null || true
  sleep 1
done
I recommend testing this script by running it manually and debugging until everything is working as you expect. Then ^C it move on to automatic installion. (If ^C doesn’t seem to be interrupting it, try holding it down for a couple of seconds.)
Finally you should arrange for this script to be running all the time. On the Mac I use the following .plist file:
$ cat /Library/LaunchDaemons/uk.org.greenend.rjk.ssh-forwards.plist
<?xml version="1.0" encoding="UTF-8"?>
<!DOCTYPE plist PUBLIC "-//Apple Computer//DTD PLIST 1.0//EN" "http://www.apple.com/DTDs/PropertyList-1.0.dtd">
<plist version="1.0">
<dict>
	<key>EnvironmentVariables</key>
	<dict>
		<key>LANG</key>
		<string>en_GB.UTF-8</string>
		<key>LC_ALL</key>
		<string>en_GB.UTF-8</string>
	</dict>
	<key>Label</key>
	<string>uk.org.greenend.rjk.ssh-forwards</string>
	<key>ProgramArguments</key>
	<array>
		<string>/local/bin/setup-ssh-forwards</string>
	</array>
	<key>WorkingDirectory</key>
	<string>/var/root</string>
 	<key>RunAtLoad</key>
 	<true/>
</dict>
</plist>
You can install it as follows:
$ sudo launchctl load /Library/LaunchDaemons/uk.org.greenend.rjk.ssh-forwards.plist
At this point your tunnels should be up and running.
Under current Ubuntu (10.04) you can create an Upstart job to run the setup script:
$ cat /etc/init/autoforward.conf
# autoforward - automatic SSH forwarding

description "automatic SSH forwarding"

start on runlevel [2345]
stop on runlevel [!2345]

respawn

exec /usr/local/bin/setup-ssh-forwards
It should not be executable. You can start it as follows:
$ sudo initctl start autoforward
autoforward start/running, process 11590
(On other Unix platforms you’re on your own, for the time being.)
You will need:
These instructions assume that everything has been installed at its default location, and that Windows 7 is in use. They shouldn’t be hard to adapt to earlier versions of Windows however.
Make sure the directory containing the PuTTY tools is added to %PATH% (Control Panel > System > Advanced > Environment Variables). You can manage without this, but it’s a whole lot easier with.
Use puttygen to generate a key pair without a passphrase, and save the private key somewhere in your Documents directory. Verify that it is not world readable, using the Properties > Security in the file manager. Take a copy of the pastable version of the public key.
Create a login on the target system and add the pastable version of the public key to its ~/.ssh/authorized_keys file.
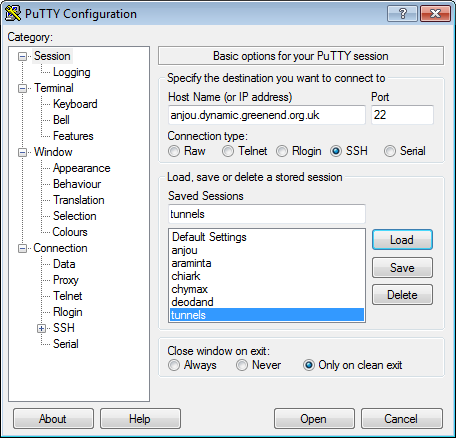
Start up PuTTY and create a new session called “tunnels”. Tell it to connect to the target system:
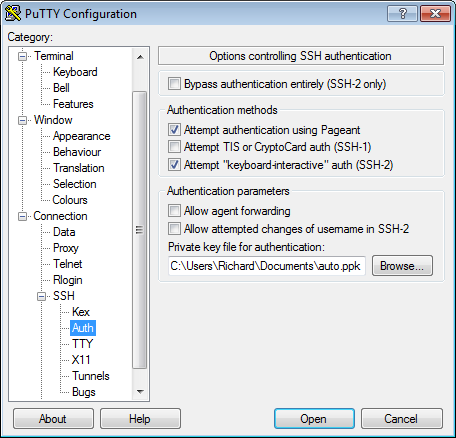
Turn on SSH protocol-level keepalives and TCP keepalives. This ensures that the session terminates quickly if the network fails.

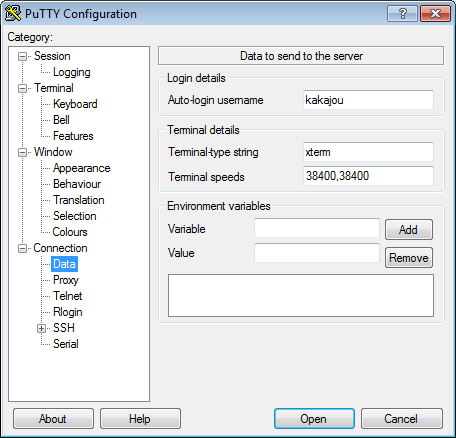
Configure the username to log in as.
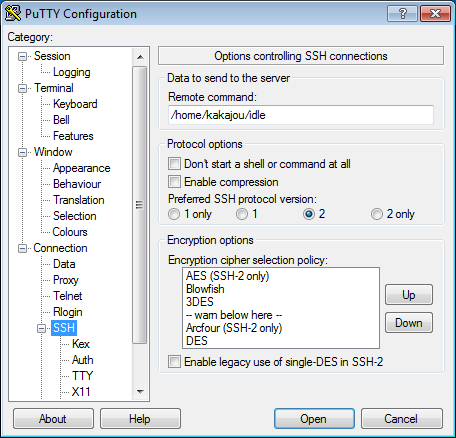
Set the command to execute remotely.
Specify the private key to use.
Set up tunnels according to taste. Here I forward my web proxy, IMAP server and MTA. (Actually they are all the same machine.)
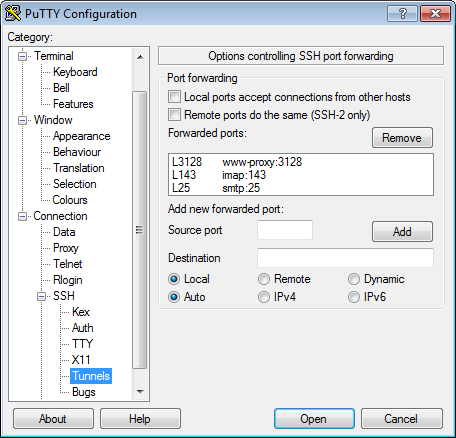
Don’t forget to save the session when you’re done.
Then try setting up a forward:
C:\>plink -load tunnels
The first time, you will need to confirm the server’s public key fingerprint.
You can test it by connecting to one of the forwarded ports, for instance via putty localhost 3128. If you don’t get a connection refused error after a second or so, it’s working. A stronger test is to try configuring an application to use the forwarded ports as intended.
At this point you could stop and just use the saved session manually on demand. However, I prefer to have it automatically set up tunnels without human intervention.
You can now create the service. Note that you will need to run the command prompt “as administrator” on Vista and later. The command to create the service is:
C:\Windows\system32>"c:\program files\Windows Resource Kits\Tools\instsrv.exe" TunnelSetup "c:\Program Files\Windows Resource Kits\Tools\srvany.exe"

The service was successfuly added!

Make sure that you go into the Control Panel and use
the Services applet to change the Account Name and
Password that this newly installed service will use
for its Security Context.
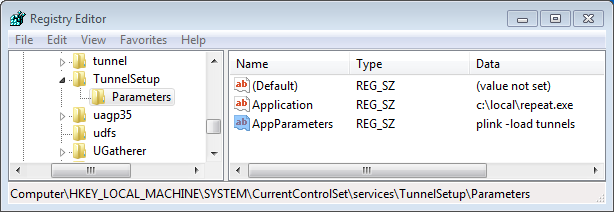
Now run regedit and go to KEY_LOCAL_MACHINE\SYSTEM\CurrentControlSet\Services\TunnelSetup. Now you can configure the command that the service runs, which involves three steps:
1. Create a Parameters key, with Edit > New > Key. Select this key.
2. Create a new string value called Application. This should be set to: c:\local\repeat.exe (or whatever location you install repeat.exe at).
3. Create a new string value called AppParameters. Assuming you followed the advice to put plink on the system %PATH%, this should be set to plink -load tunnels. The result should look like this:
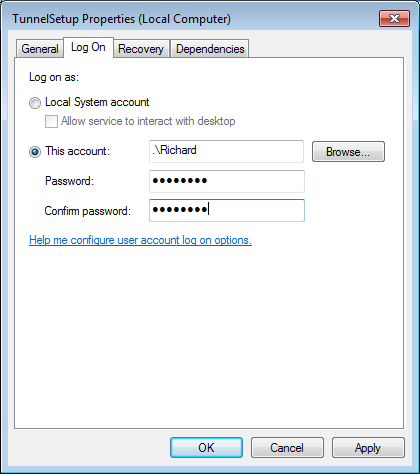
Next go to Control Panel > Administrative Tools > Services. You should find the new service there as TunnelSetup. Configure it to run as yourself:
Start the service. The tunnels should start working shortly.